Showreel Commentary

Talk about the shots in the showreel. Why are the shots in the showreel? To show technical ability and creativity, composition?

Example

Essentially if there’s a shot in the showreel you need to explain why it is there and give it technical, creative and compositional backing up.

Shot one: Bokehs – This shot shows experimentation with low key lighting and aperture.

Shot two: Large Vars – This shot shows experimentation with Shutter speed and high fps recording. and follows the rule of thirds with a horizon line.

Shot three: Glass red fluid rising and filling – This shot shows further experimentation with Shutter speed and high fps recording. and shows correct composition following the rule of thirds as well as being somewhat symmetrical and has leading lines adding interest.

Shot four: Dice being dropped into bubbled water – This shot shows experimentation with lowkey lighting and shutter speed. This shot is creatively composted with a horizon line and the top of the water intersects with the top third.

Shot five: Metal Grinding – 400fps – Bokehs – This shot shows creative experimentation with Shutter speed and high fps recording. It correctly follows the rule of thirds. This shot could be used in some kind of client video which shows a possible advertisement to clients.

Shot six: Metal Grinding – 800fps – Bokehs – This shot shows creative experimentation with Shutter speed and high fps recording. It correctly follows the rule of thirds. This shot could be used in some kind of client video which shows a possible advertisement to clients.

Shot seven: Metal Grinding – 800fps – Bokehs – This shot shows creative experimentation with Shutter speed and high fps recording. It correctly follows the rule of thirds. This shot could be used in some kind of client video which shows a possible advertisement to clients.

Shot eight: Picking up dice and dropping it – This shot follows compositional rules such as rule of thirds and a horizon line. It shows creative experimentation with low key lighting. It also shows creative experimentation with high shutter speed and fps recording.

Shot nine: Typing shot – This shot shows creative experimentation with the creative use of soft natural lighting, is reasonably well framed and shows experimentation with the technical and creative use of the atmos ninja blade.

Shot ten: Snow Shot – This shot shows creative use of slow-motion High fps and shutter speed. It also shows creative use of composition with a horizon line being the cable and has leading lines in the background.

Shot eleven: Shortfilm – Bedroom shot – This shot shows creative use of technical equipment which is the Ronan. It also shows the creative application fo compositional framing.

Shot twelve: Field shot houses – Exposed for the ground – This shot shows technical ability with correct exposure settings as well as the creative application of it. This shot also shows the creative application of depth of field and focus pushing.

Shot thirteen: Field shot houses – Exposed for the sky – This shot shows technical ability with correct exposure settings as well as the creative application of it. This shot also shows the creative application of depth of field and focus pushing.

Shot fourteen: Field Panning shot – Shows creative use of technical ability – panning motion creates interest in the shot. Also Shows creative application of composition with the rule of thirds and a lower horizon line.

Shot fifteen: Man walking the dog in the field – Shows creative application of framing, leading lines, the rule of thirds.

Shot sixteen: Shot of character chasing another character – Shows creative application of framing, shows creative use of technical ability with the Ronan.

Shot seventeen: Shot of character coming into the room looking around then going out and downstairs – following/tracking shot – Shows creative application of framing and creative use of technical equipment with the shoulder mount.

Shot eighteen: Traffic bokeh’s – shows a creative application of aperture and focus pushing and pulling.

Shot nineteen: Through chair shot – Shows creative application of compositional framing and creative application of focus pushing.

Shot twenty: Shot of sun rays – Shows creative application and experimentation of natural hard lighting hard shadows and exposures.

Shot twenty-one: Tilting down tree shot – Shows creative application of tilting downwards and compositional framing.

Shot twenty-two: Shows creative application of lighting, composition and focus pushing.

Shot twenty-three: – Shows creative application of framing rule of thirds.

Shot twenty-four: – Shows creative application of framing rule of thirds and creative lighting.

Shot twenty-five: – Shows creative application of framing rule of thirds and use of foregrounding the other character.

Shot twenty-six: – Shows creative application of framing rule of thirds and creative lighting.

Shot twenty-seven: – Shows creative application of framing rule of thirds and use of foregrounding the other character.

Shot twenty-eight: – Shows creative application of framing rule of thirds, symmetrical.

Shot twenty-nine: – Shows creative application of framing on the lower third, show creative use of lighting.

Shot thirty: – Shows live performance framing, leading lines.

Shot thirty-one: – Shows live performance framing, the rule of thirds.

Shot thirty-two: – Shows live performance framing, the rule of thirds.

Shot thirty-three: – Shows creative application of camera functions, timelapse, Creative application of technical equipment – lens filters ND and Coloured

Shot thirty-four: – Shows creative application of camera functions, timelapse, Creative application of technical equipment – lens filters ND and Coloured

Shot thirty-five: – Shows creative application of camera functions, timelapse, Creative application of technical equipment – lens filters ND and Coloured

Shot thirty-six: – Shows creative application of camera functions, timelapse, Creative application of technical equipment – lens filters ND and Coloured

Shot thirty-seven: – Shows creative application of framing rule of thirds and exposure.

Shot thirty-eight: – Shows creative application of framing rule of thirds and exposure and tilting upwards motion.

Work Based Learning

Research

What is needed for a production?

For a production, one of the most important processes is the pre-production stage. During this stage things such as shot lists, floor plans and meetings and any other matters depending on who the client is and what they want. For the Halle orchestra as a crew, we meet the client who was the musical director Steve Pickett. During this meeting the key points raised were: what the Halle do, the event that needed to be covered and the locations for where. The layout of the venue (Bridgewater Hall) and (City hall). Where each section of the Orchestra was on stage and the names for the different sections such as the woodwinds and brass. The placements and amount of cameras needed. As well as a visual mixer which required a total of 4 camera operators and one visual mixer / Atem operator. The camera angles and sizes of the shots such as wide, medium and close-ups. The details of the performances (guest performers etc.) and the dress Code (Dark clothing blend into the background and doesn’t attract the attention of the audience.) – After the meeting Client, decisions needed to be made such as the cameras to use. As a group, we decided to use the JVC’s I had previously used for the Graduation at Sheffield Cathedral and an on a music performance for the music department in the college. So I had both experience and knowledge of using the JVC’s. Although recently I used the Sony F700s and F100s on the drama duologues this helped me to use the JVS’s more. Effectively as they have a somewhat similar layout of manual settings on the side of the camera.

Whilst contacting the client things were discussed such as who the client was and what his role was. When the short film would need to be submitted by HorrorCon 19th May and its guidelines such as the length the short film needed to be which was – (5-10 minutes). My group’s basic story plot for a horror short story was discussed with the client and about whether the plot would work or not and after talking with him the idea was changed to be a bit more horror genre than it was. After the phone call with the client, jobs were handed out to each of the crew members. Once we had our own job roles I created an online checklist which all the crew could access, this meant that deadlines could be set and known to all of the crew which made sure that things weren’t behind schedule.


My Role Camera Operator: According to creativeskillset.org camera operators carry out the Director of Photography’s (DoP) and Director’s instructions for shot composition and development. They are usually the first people to use the camera’s eyepiece to assess how all the elements of performance, art direction, lighting, composition, and camera movement come together to create the cinematic experience.

After the Director and DoP have rehearsed and blocked the shots, the Camera Operator and DoP decide where to position the camera and what lenses and supporting equipment to use. Camera Operators liaise with the Grip and other Heads of Department and keep them informed about how the position and movement of the camera might impact on their workload.

During shooting, Operators are responsible for all aspects of camera operation, enabling the DoP to concentrate intensively on lighting and overall visual style.

Camera Operators make sure the camera and equipment are prepared for the required set-ups and ready for any last-minute changes. They must be able to multi-task and to watch, listen and think on their feet while carrying out complex technical tasks.


Skills

Whilst working with both of these clients I used skills of communication with the crew and the client upon the placements of the cameras, shots, location of the venues and travel times. I used communication techniques to make this easier such as listening, taking in the information and then adding ideas/advice for camera set up. I Also contributed ideas towards the Whitby project such as ideas for equipment to be used and some shot ideas that would require the Ronan stabiliser as well as contributing to storyboarding for the scenes. I also used skills of organisation and punctuality to make sure I was where I needed to be early to set up equipment in Whitby on shoots or to get transport in time for setting up equipment.

Production / Skills

In the production process, it is important that every member of the crew knows their role and is flexible and willing to learn. In any production, there needs to be at least a camera operator and a director. This is because there needs to be a direction and a person to follow that director otherwise different ideas may be introduced in an erratic way which could in the Whitby project made the audience confused. Or in the Halle orchestra product, it could cause the performance to not go correctly and change the overall perspective of the performance. In the production process, it is also important that all the equipment is set up ahead of time in case of any problems that may occur such as connection problems between the cameras and the atem. this did happen at one of the performances and was overcome with a new wire. However, if this had been not before the performance but when it was starting it would have negatively affected the overall performance. Another thing important in a performance is to assist other crew members in their job because even if the one role for example camera operator is correct if the atem is not correctly functioning it wouldn’t matter how could the camera operator was. the same can be applied in the Whitby project if even one role isn’t correctly performed such as the sound recordist it won’t matter to the audience how good it looks if it sounds horrible.

In my role as camera operator, I was able to use and improve my technical effectiveness, communication, problem solving and ideas contribution. Whilst working with the Halle orchestra and with the actors in the crew I needed to be professional and creative although in one situation I needed to fade into the background not to draw attention and the other in Whitby talk and contribute ideas for creative shots. Whilst working with the Halle orchestra I used my technical and communication skills by reframing and focusing shots quickly after setting up all of the equipment – checking it was all functioning correctly and doing correct framing after listening correctly to the director as to the music section and shot size I needed to get. However with the Whitby client which was more of an unassisted and controlled environment things skills such as punctuality and organisation were in some ways even more important. As well as on set ideas generation such as shots, and problem-solving such as issues with the Ronan. I solved a problem on set with the Ronan as it wasn’t fully staying stabilised this was because at some point the drop time which makes the movement fluid and smooth was incorrectly positioned I corrected this and solved the problem.


Key learning points

  • Filming a live performance in a professional environment.
  • Making decisions for appropriate framing of shots that could influence the overall performance.
  • Learning how to effectively communicate with the client to make sure they get the best product/performance possible and the client’s needs are met.
  • Working with a crew and actors
  • Assisting other crew members in their roles


Critical Analysis.

Some ways in which I would improve in future work with clients would be to improve upon my communication, and ideas contribution within meetings with the client, this is because I feel it could further improve a performance or project. Another thing that I would improve upon is making sure that shoots pre-shot/ rehershed this is because it will further improve upon the overal quility and reduce the time spent ajusting to problems on set. I would also improve further by trying to pre think out possivle problmes in the pre production stage and either practise the practical eqiptment in a test shoot or come up ahead of time with mechanisms to be put into place to solve problems quickly and effecvively such as making sure to look at ones own role from a third perspective. This would make sure that I correctly fufil my role. Another thing could be improved upon next time to make sure that all of the crew help out even if they don’t have a role as it builds morale and support as well as creating a more effective and professional final product. to conclude this analysis the most prominent things that need improvement for me personally is to contribute more creative ideas in group meetings and to rehearse shoots ahead of time as well as building up my skills in problem-solving and flexibility.

Bibliography

Creativeskillset.org. (2018). Camera Operator | Creative Skillset. [online] Available at: http://creativeskillset.org/creative_industries/film/job_roles/3073_camera_operator [Accessed 22 April 2018].


Audio – Production Unit – Statement and Research

Audio Statement

The scene I have selected to replace the audio of is Star Trek (2009) – Romulan Vessel Infiltration Scene.

I have selected this scene because I want to research and experiment to recreate the following sound effects: Phaser, transporter, I want to recreate these using Foley rather than just use all pre-recorded sound effects because I want to experiment with techniques used whilst recording foley sounds such as doing a live recording – Aka When sounds are recorded at the same time they happen in the clip. I’ve also selected this scene because of the multitude of sound effects to create such as the different speeds and paces of fast walking and running as well as the phaser impacts into the people, as well as the ricochets off the wall and floor. as well as physical impacts of the body’s onto the hard flooring in various different ways. As well as smoke and head dispersions.

To recreate the foley sounds for the clip above I will be using the zoom 6 recorder, this is because I am limited to this kit and the Marantz kit and because using the zoom 6 will be more appropriate and effective for this because I am more familiar with the zoom than the Marantz kit.

For recreating the sounds I intend upon using Uni and Bi-directional microphones, however, I will not be using an omnidirectional microphone. This is because I want recordings of sounds that are separate so that I can mix them appropriately and chose the sounds that are in there. Whereas with the omnidirectional recording in all directions I will not be able to control all the sounds that are recorded. An example of this is for the ambience I don’t just want one recording with various sounds I will be taking separate individual different hums and then compiling them into a Wild track. I will be using a uni and bi-directional mic because the directional mic has a longer range and is more sensitive but it also has a low angle range of recording vs the stereo which has a wider angle recording range but a decreased recording distance and sensitivity.

– – – Secondary – – – Research    – – –

Compression – Makes the quiet bits loud and the loud bits quieter

Reverb – Can make a sound seem right next to the person with the headphones on or on the speakers nearer to the audience or can seem far way emulating the atmosphere of a scene depending on its location.

Pitch – The pitch is how low or high a sound is and can be used to change voices and other sings such as keynotes on a keyboard to make them more resonating at high or quick and base.

EQ – EQ is the levels of the frequency response of an audio signal. it can be used to make voucal sound better and can also be used to make sounds seem loudeer and more present.

ADR – Automated Dialogue Replacement can be used when on location recordings are unusable. ADR is also used because it makes the voice separate letting the audio mixer pick what sounds are in the scene and be in complete control.

Screen Shot 2018-04-22 at 11.22.03

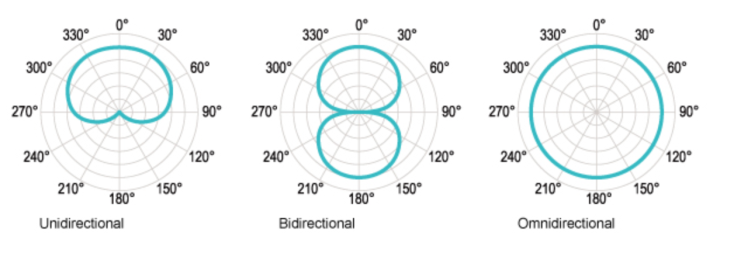
1) Unidirectional Microphone Compressed Shot gun Mic

This type of microphone features directionality to the front only and is also known as “cardioid” (because of its heart-shaped directional pattern). Cardioid mics are most often used with PA systems for vocals, instruments, etc. In the diagram, 0°indicates the front of the microphone. These kinds of mics are also used on set/ location filming films, series, documentrys and other related visual media with on location dialogue recording. In the duo logues I used a Compressed Shot gun mic for recording them because it records the vouce of the actor and because of it been uni directional it records the least amount of noise than all of the other mirophones which makes the actors be clearly heard. I have also used it on other projects such as the whitby short film and on some interviews whcih I used it for the same reason I did on the duo logues.

(2) Bidirectional Microphone

This type of microphone features directionality to the front and rear. They are often used to record audio between two people who are face to face, such as during radio interviews.

(3) Omnidirectional

This microphone type has no directionality. “Omni” mics are used to pick up all or wide range audio. For example, they are used for choirs, when many instruments are played at once, or to pick up all audio on the stage. This type of microphone could also be used for recroding a wild track also because it picks up everything anything that is making a sound in the area would have to be delibrate.

Microphone Types

It is often taught that “sound is vibrations in the air.” We are able to enjoy music because we sense these vibrations in the air as sound. Microphones are used to convert these vibrations into electrical signals. Here are the two main types of microphones:

 Shotgun mics are normally used for outdoor tasks such as news reporting and wildlife documentation as well as on set recording in films. These mics are known for their unique ability to isolate sound.They do so, using a design known as an interference tube, which features a series of slots designed to reject off-axis noise.  The longer the tube, the narrower the pickup angle.Using these mics, you can record further from the sound source, in much noisier environments.

 (1) Dynamic microphones – Stereo Mic

Characteristics

Construction is simple and comparatively sturdy.
No power supply is required.
Relatively inexpensive.

2) Condenser microphones – Shotgun Mic

Characteristics

The shot gun mic has a good sensitivity at all frequencies a power supply is required and they are Vulnerable to structural vibration and humidity.

Reference: Which type of microphone should I choose?

Condenser microphones may have greater appeal because they have “good sensitivity at all frequencies”. However, they are not always the most practical choice.

Often during recording, a “pop shield” filter is required to protect against noise caused by the vocalist’s breath hitting the condenser microphone. This is because condenser microphones are able to react to more subtle sounds. On the other hand, condenser microphones are not suited for high-volume recording, so dynamic microphones are mainly used in situations where loud audio is to be picked up.

Condenser microphones are used with PA systems in cases where a wide band of frequencies, ranging from low to high, is to be picked up for choir vocals, acoustic pianos, hi-hat cymbals (which are known for their sensitive and high frequency), or for use “overhead” to pick up sounds from the entire drum set.

Possible Problems – Experiments – Primary research

Some problems that may occur whilst recreate sound effects are with the following sound effects – Phaser, Transporter, ambience. Recreating these could be problematic and difficult to recreate. However, after researching into the matter and watching tutorials I found that to make the phaser sound effect a slinky could be used, however, I got the idea that anything with a resonating sound that was metallic could create the same if not a better effect. I experimented doing this, I used the Shotgun mic, stereo mic and to record various different metal ricochets for phaser ricochets as well as experimenting to come up with a phaser firing sound effect.

Phaser Experiment

During this experiment, I found that the shotgun mic was not having the effect I wanted it was just giving a thud but no resonating metal sound afterwards that I was hearing with my ear, not the microphone this is because the unidirectional microphone doesn’t have a wide enough recording range.

So next I tried the same experiment with using a stereo mic (Bidirectional), I did this because I wanted to create more of a resonating sound and felt that the bidirectional microphone would create a more resonating after effect rather than just a thud and nothing.  After experimenting with using a bi-directional microphone I found that it did create the resonating sound I was trying to achieve and I then created two different versions using a light and heavy impact which I did by using a thin foil tray and a slightly flexible metal lid whilst recording through a metal tube.

After taking these different sound effects into trying to pitch, reverb and eq them they still did not achieve the recreation sound effect of the phase I was hoping for.  So I went into logic pro x and started experimenting with the digital synthesiser using different notes to create the phaser blast sound effects. Although I did, in the end, use the metallic sounds to create the phaser sound effect of it changing from kill to stun.

And for the stun sound effect, I also created a slightly different pitch for the stun setting because I wanted to recreate the sound effects and felt that it would be appropriate for them to be different. I also made the effect resonate a little less and be a bit quicker.

Transporter effect

For the transporter effect, I experimented with using different high keynotes in the in build synthesiser and then took them and exported and reimported them and experimented pitching and eq.

I did not feel this effect was appropriate so I then used a more bright and punchy keyboard in the digital synthesiser. I felt that this was more appropriate for the transporter sound effect.

Wild track – Ship ambience.

I also did some primary research into making the ambient sounds of the ship such as Smoke puffs and different variations of hums I did this by experimenting filming boilers, humidifiers, fridges, basically anything that created a recognisable hum. I alternated filming these sound with a bidirectional mic and a unidirectional mic, I did this because I wanted to see the difference and have different recording choices for when it came to mixing the sounds. 

Experimented with Ship Ambience, filmed dehumidifier, fridge.  – Different Microphones

Mono – Uni-Directional

Stereo – Bi-Directional

Planning

SFX, Foley, Music spotting sheet

References

Reference 1

https://ehomerecordingstudio.com/types-of-microphones/

Reference 2

http://www.yamahaproaudio.com/global/en/training_support/selftraining/pa_guide_beginner/microphone/

Videos

https://www.youtube.com/watch?v=t20MX84mp9U

Talk about it / tutorials

http://www.dailymotion.com/video/x3sqyem

Playlist

https://www.youtube.com/playlist?list=PLt-CWqfBaRl5kLcpr3ZvvGEP7GLaAALl8

Add Harvard referencing / APA Referencing

http://www.citethisforme.com/uk/referencing-generator/apa

Website

In-text: (E-Home Recording Studio, 2018)

E-Home Recording Studio. (2018). Recording Studio Microphones: The Ultimate Beginner’s Guide. [online] Available at: https://ehomerecordingstudio.com/types-of-microphones/ [Accessed Apr. 2018].

Video

In-text: (Dailymotion, 2018)

Dailymotion. (2018). Star Trek (2009) – Ben Burtt and the Sounds of Star Trek – Video Dailymotion. [online] Available at: http://www.dailymotion.com/video/x3sqyem [Accessed Apr. 2018].

Create a free website or blog at WordPress.com.

Up ↑